Loading...
WebGPU Renderer: Textures
03/27/2024
Controls
Overview
This is the sixth post in a series I am doing on creating my own renering engine using the WebGPU API. In this post I'll talk about my Texturing system. You can see this in action in the interactive demo above.
In the process of working on this feature of my renderer, I ran into one of those really evil bugs. One of those bugs where the only word you can really use to describe it is "Sinister". The issue was that, no matter what I tried, my textures would not seem to load. There were no errors in the console. No indication of why the textures weren't loading. Nothing. At this point, I spent hours scrutinizing every line of code even somewhat related to textures. Hours wasted... no progress was made. Eventually, I had to commit the cardinal sin of programming... I had to start to believe that the bug was not actually caused by my code. (Now you can see the sinister nature of this situation). To make a long story short, the problem had to do with my laptop's integrated graphics processor. By default, Chrome renders using the weaker, less power-hungry, Intel integrated graphics, rather than the much more powerful NVIDIA RTX GPU (which I had assumed it was using in the first place). For whatever reason (again, the WebGPU API gave no indication of this), the integrated graphics was not actually storing any image data after I had attempted to write it to the GPU.
So hey... if you are not seeing any textures, try switching which GPU chrome uses.
You know a bug is bad when you feel sick to your stomach even after you fix it. Sometimes I like to think bugs are evil creature-like beings and I am destroying and eradicating and smiting them for the good of humanity... Just another one of my many coping mechanisms that I have developed as a programmer.
Texturing
Texturing is the process of modifying the surface of an object at a given position using some source of data, such as an image or a procedural function. This opens the door wide open to a bunch of cool techniques we can use to modify our object's surfaces, but for now, we will start with a very simple use case: modifying color.
Texturing is typically a per-pixel operation, so the first step of the texturing process is to map a pixel to a position within the image we want to sample from. There are a bunch of ways to do this, such as utilizing the world space position of the pixel. However, one of the most common ways is to use a coordinate system that is model space, so that no matter where the model moves in the scene, a pixel on its surface will always sample from the same position in the texture. This is referred to as the object's "UVs" (in reference to the 2D axes of a texture being labeled 'u' and 'v'). Lucky for us, we already did the hard work of assigning UVs to our object's vertices back when we implemented our procedural meshes.
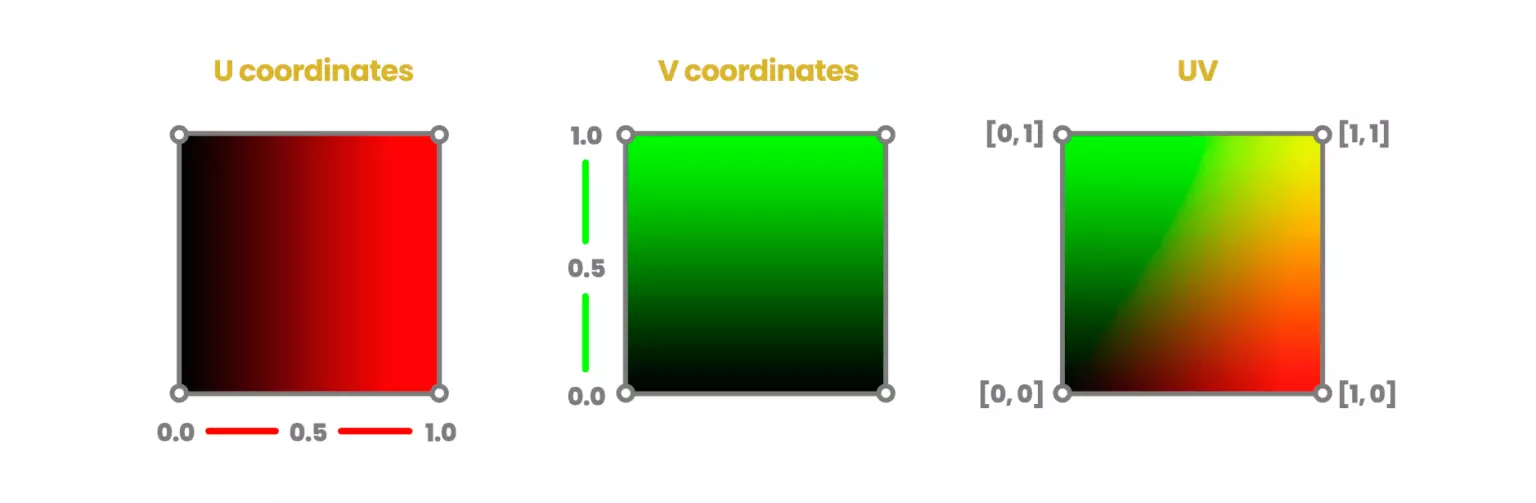 Here is a visualization of the uv coordinates of a texture
Once we have our UV coordinates, we can determine where from the texture we want to sample. The simplest way to do this is a 1:1 correspondence from texture coordinate to location within the texture. However, you can add some additional flexibility to this process by scaling the coordinates to make the texture appear bigger or smaller, or offsetting the texture coordinate to shift features of the texture to different locations. One must then consider, what happens if my scaled and offset texture coordinates go outside of the bounds of the texture locations? There are many ways to handle this, such as just clamping the extending coordinates to the edge. In this scene, for the checkerboard texture, if the texture coordinates exceed the bounds of the texture, they just wrap back around to the other side.
Here is a visualization of the uv coordinates of a texture
Once we have our UV coordinates, we can determine where from the texture we want to sample. The simplest way to do this is a 1:1 correspondence from texture coordinate to location within the texture. However, you can add some additional flexibility to this process by scaling the coordinates to make the texture appear bigger or smaller, or offsetting the texture coordinate to shift features of the texture to different locations. One must then consider, what happens if my scaled and offset texture coordinates go outside of the bounds of the texture locations? There are many ways to handle this, such as just clamping the extending coordinates to the edge. In this scene, for the checkerboard texture, if the texture coordinates exceed the bounds of the texture, they just wrap back around to the other side.
The process of implementing this into my renderer was actually not too bad (bugs aside). It involves:
- First loading in the image you want to use as a texture as a bitmap.
- Creating a texture on the GPU and writing the image bitmap to said texture, so the necessary data is accessible on the GPU.
- Creating a Texture View, which gives us a reference to that data and how to interpret the data in our shader code.
- Creating a Texture Sampler, which allows us to specify how to map texture coordinates to texture locations. Like I said before, we have already implemented support for UVs, so in the shader, it is as simple as calling a texture sample function using our sampling to retrieve a color value.
Mipmapping
One thing that is very noticiable once you start using textures are the aliasing artifacts that begin to appear on objects that are far away. This is due to the sampling frequency of distance objects not being high enough to capture high frequency details.
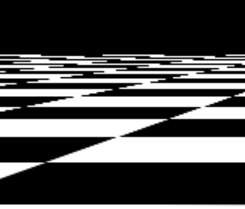 Zooming into the edge of checkered floor, we can see the aliasing artifacts begin to appear
A common technique for mitigating these artifacts is to use a technique called mipmapping. In this technique, you recursivley store downsampled versions of the original texture. As objects get farther away from the camera, you use a lower and lower resoltion mip map. This adds a "blurring" effect to textured objects that are far away, however the result is much more appealing than the aliasing artifacts that were there before.
Zooming into the edge of checkered floor, we can see the aliasing artifacts begin to appear
A common technique for mitigating these artifacts is to use a technique called mipmapping. In this technique, you recursivley store downsampled versions of the original texture. As objects get farther away from the camera, you use a lower and lower resoltion mip map. This adds a "blurring" effect to textured objects that are far away, however the result is much more appealing than the aliasing artifacts that were there before.
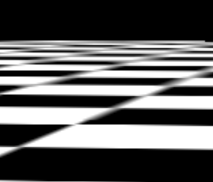 Here is that same portion of the checkered floor after we apply mipmapping. You can see aliasing is replaced by a smoother blur.
Side note: The mip in mipmaps stands for "multum in parvo" which means "many things in a small place" in latin. Dude. We gotta get whoever came up with this name, man. Its too good. I am already insecure enough about my naming abilities.
Here is that same portion of the checkered floor after we apply mipmapping. You can see aliasing is replaced by a smoother blur.
Side note: The mip in mipmaps stands for "multum in parvo" which means "many things in a small place" in latin. Dude. We gotta get whoever came up with this name, man. Its too good. I am already insecure enough about my naming abilities.
Resources
Real-Time Rendering 4th Edition - Tomas Akenine-Moller et al.
Loading Images - WebGPU Fundamentals
Seamless Abstract Texture Pack - Screaming Brain Studios
UV coordinate image - Jettelly